Showing posts with label Tutorials. Show all posts

Wednesday, December 3, 2014

Holiday Chifferobe ~ Chalk Paint Rehab

Good Morning!

It's been a long time since I have posted and I apologize for that!

I have been so busy catching up on all of my furniture finds and here is my latest piece!


I love rehabbing chifferobes!  I think they are one of my favorite pieces of furniture to do.  A little more time consuming but there are so many things a chifferobe can be used for!

This piece was a multi tone wood color before I started.
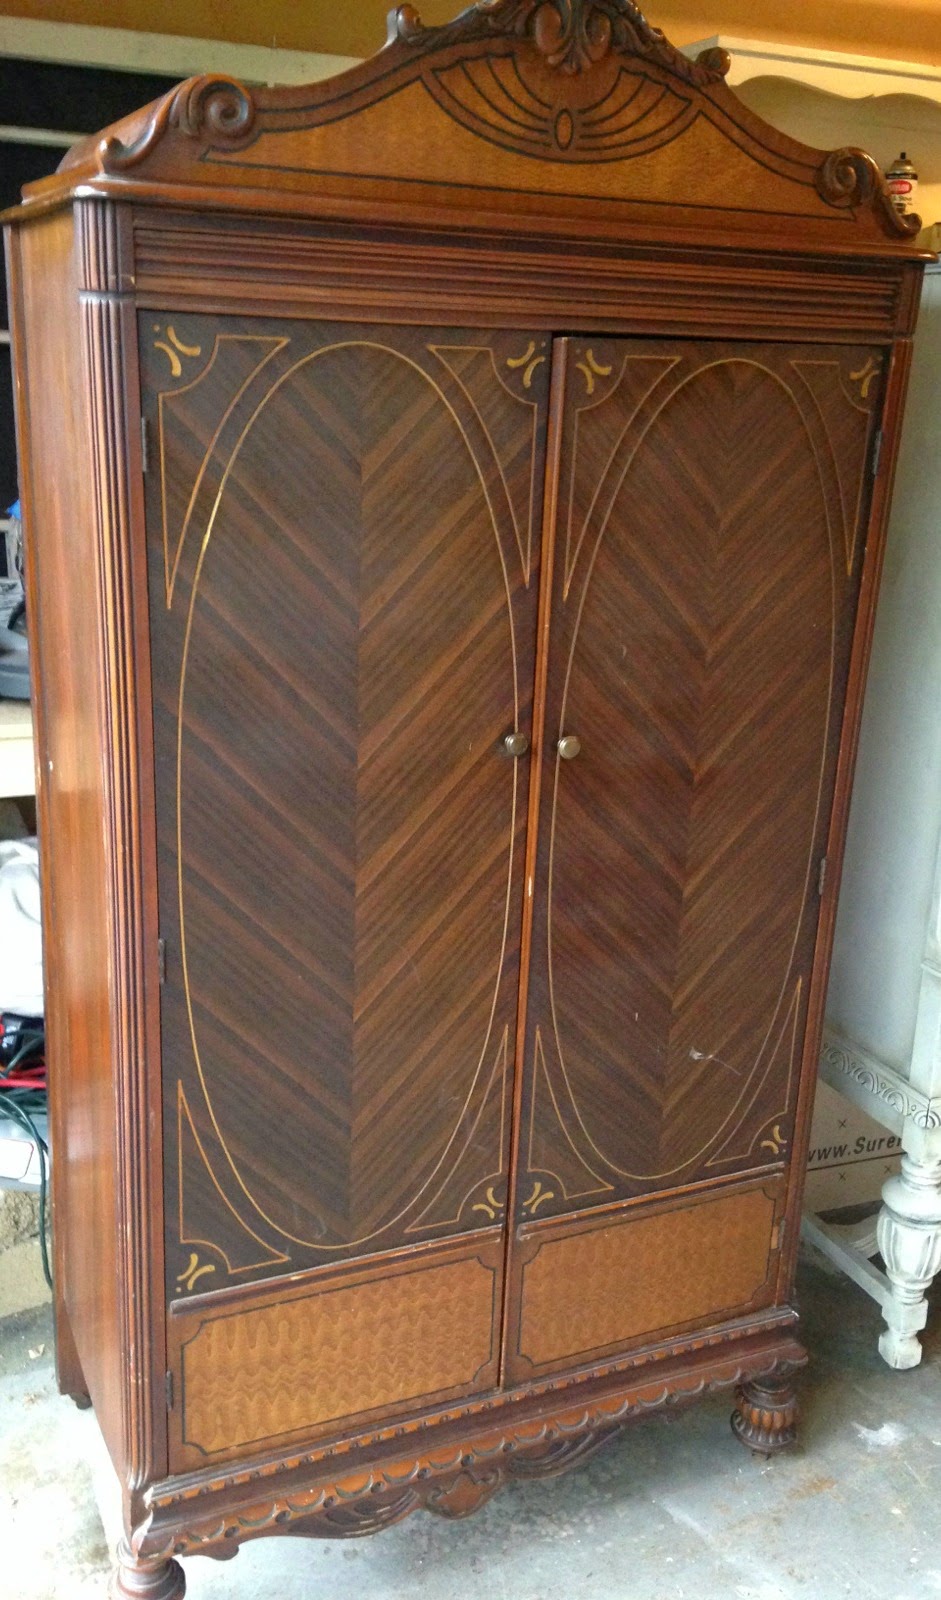


I always look for pieces that are structurally sound because I don't have the time to repair furniture.

I used a multi-step process on this one.  I also paint the entire piece including the inside with this technique!

I use Annie Sloan Chalk Paint.

Step One & Step Two:

Base Coat & Second Coat French Linen 

I like my pieces to have a gray undertone so 2 coats are needed.

Step Three:

Paint Over French Linen With Old White

When I paint on the Old White I paint using a dryer brush, allowing the base coat of the French Linen to show thru.  I also paint randomly, crisscrossing, as I go, almost painting an 'x" formation the entire time.  This actually gives a lot of depth to the piece.

Step Four:

When the Old White has completely dry, I wet sand!  I use a wash cloth and a sponge with a rougher side instead of sand paper.  I want the grey to be my under coat that shows through, not the wood itself, and sand paper is too harsh for this technique.

Wet Sand all of the edges in places that would show wear over the years.

Step Five:

Age With Cocoa!

I Love the color Cocoa!  This is a great color I use to age the piece.  Take a small stiff bristled craft brush and dip into the Cocoa paint.  Wipe off most of the paint onto a paper towel leaving the brush more dry than wet.  Paint the Cocoa onto the edges of the of the piece, corners of the doors, around the knobs, basically any place that will show wear and tear.  Then wipe over a bit with a wet cloth.  I use a rag off technique where I just push the wet cloth onto the Cocoa paint area and lift off removing most of the paint, but allowing some old brown to be there.  Am I making sense?  If not...please email me I will walk you through it!


Step Six:

Seal With Clear Wax!

Then you are done!


Sunday, March 16, 2014

Trash To Treasure Using Annie Sloan Chalk Paint


I was so excited to come across this wonderful old wooden Rocking Horse at the Goodwill.  The only problem was the rocker was broken in 3 places, and the colors were not in my theme.  But, it was marked down to an amazing $12.00 and I love a good bargain...so that here we are!

I took the rocker part off and removed the black tail, then the chalking began!

I used a base coat of French Linen which is a wonderful warm grey color and allowed paint to dry.

I then brushed the entire horse with a coat of Elmer's Glue and let the glue rest about 15 minutes.

I then applied a nice coat of Annie Sloan Pure White over the damp glue and allowed the paint to dry thoroughly.  

When the paint started to dry, the glue underneath started to pull and made the white "crackle".  This allowed the grey to show through once the paint was totally dry.


A little bit of sanding, some dry brushing with more French Linen and a new tail out of jute and this horse now has a totally new look.

I love it and so easy to do!


Saturday, March 15, 2014

European Sideboard Make Over Annie Sloan Chalk Paint


I've been working on a new piece that I have recently found in my search for European style furniture.  This piece had the most amazing wood detail that it was a no brainer when I saw it posted I had to go check it out.  I am ecstatic with the results and hope that you will find this post inspiring for your next chalk paint piece! 


Before! 

This is the original post.  I was really not sure what to expect when I arrived.  However I was pleasantly surprised to see that the piece was structurally in amazing condition for the age so I my boys loaded my SUV and I couldn't get the piece home fast enough to start chalking! 


I started by cleaning the entire piece both inside and out with Mineral Spirits.  I used a toothbrush for all of the detail areas.  I usually don't do this, however this piece had a musty smell from sitting in a storage room and after the cleaning....the smell was gone!


I have a certain look I always do and the majority of my clients love.  So we are going to start off by painting the entire piece both inside and out with Annie Sloan French Linen.  French Linen is my absolute favorite to use when doing European style furniture.  It has a wonderful warm grey tone that I love using as a base coat when painting furniture that have a lot of detail to the wood.


Next we are going to paint over the French Linen with Annie Sloan Pure White, allowing the French Linen to show through on all the areas we have detail.

After the piece is dry, I use a damp cloth to go over all areas I would normally sand.  I like the French Linen to show through on areas that would normally show "ware" with age...so using a damp rag to rub these areas works best for me.

Next it was just sealing with Clear Wax, and repainting all of the hardware.


You can see how the French Linen shows through on the above picture.


This piece was an amazing find and now available for sale.


Have a great Saturday...I'm off to get another piece!


Monday, March 10, 2014

Get Inspired! Before & After Dresser Using Annie Sloan Chalk Paint!


Chalk Paint is so easy to use!  Anyone can do it!  
If have an old dresser that needs some updating, this post
will inspire you to get started!


I am a Craigslist Junkie!  I find most of my pieces there or Goodwill.
If using Craigslist, just be careful when going to view the piece.  Make sure someone is with you.  


This was the "BEFORE" dresser.
It was in very good condition, a little outdated though and had lots of problems on the top!


As you can see below!  I think finger nail polish remover was the cause of the large spots on top!  I stripped the top and sanded it down.  Then, I painted the top with a nice coffee color stain and finished off with a coat of poly.


What a difference on the top!


I applied 2 coats of Annie Sloan Old White Chalk Paint.

Sanded edges to distress a bit.

Gave it a clear coat of Annie Sloan Clear Wax.

Then heavily distressed with Annie Sloan Dark Wax.

I repainted all of the hardware and VOILA.

I think it turned out pretty good!


Another Chalk Paint Project Coming Soon!

This piece sold to a lovely gal.  Hope to see her back!

I'm working on several more pieces and will post soon!

Tuesday, December 17, 2013

Christmas Banner Printable DIY


Christmas Banner Printable!

I have been promising you a Christmas Banner DIY and I finally got a moment to do it.  This is a very easy Tutorial with Printable letters.  

Supplies Needed:


6 Pieces of Linen Textured White Cardstock 
(Plain Cardstock will also work)
Instant Coffee
Jute Or Twine
Greenery Sprigs
Clothespins
(I purchased Mini Clothespins at Michael's Craft Store)

Directions:

Make 2 very strong cups of instant coffee.

Pour coffee in a 9x12 cake pan.

Place one piece of cardstock in the pan, soaking it completely in the coffee mixture, and remove.  Place wet paper on a paper towel lined cookie sheet.  Blot the paper with another paper towel to remove excess and bake in oven on low heat about 225 degrees until dry.

Repeat this for all 6 sheets.

Papers should resemble below.


The more puddling of coffee on the paper the more aged it will look once baked.

Press each sheet of paper with your iron.  To avoid coffee from getting on your iron, simple place paper inside an old t-shirt and iron the paper through the T-shirt to remove any wrinkles through the sheet.

Place your paper in your printer and print out the Letters I am giving your blow.  

After printing your letters out, simply trim around the boxed line.

Hang on mantle with jute, clothespins and a piece of greenery.


To Download Letters Simply Click Below Each Letter.

I made a mistake and with the "T" in "Silent"...so print off an extra "T"' for NIGHT that is at the very bottom to use in the "Silent".


Tuesday, December 10, 2013

Vintage Christmas Music Download


I am offering you a wonderful selection of Vintage Christmas Sheet Music for download and to use for your personal pleasure.  Please do not resell the sheet music in whole or as part of a collection.

Thanks and Enjoy!

Thursday, December 5, 2013

Vintage Cotton Batting Santa's Tutorial


Cotton Batting Santa's! 

I love Vintage Santa's made from cotton.
I have been working on a tutorial for you that I feel is easy and gives the same look as the Vintage Cotton Batting Santa's!


Friday, November 22, 2013

FREE French Christmas Cone Pattern

Happy Friday!

Today I'm offering a FREE
French Christmas Cone Pattern
To Make For The Holidays!

Pattern Comes Complete With (2)
Aged French Cones 
Adorned
With Vintage Angel 
Die-CutsTo Print Ready To Print
Out On Your Color Printer!

Click HERE To Go To Download!

Enjoy!

Tuesday, July 9, 2013

DIY Driftwood Centerpiece


This is another great decorating idea ~ with Beach Cottage inspiration in mind ~ using driftwood and so inexpensive!

Can you believe the piece of driftwood below is the piece above?

With just a simple 2" Hole Saw Bit, or a 1 1/2" paddle bit, a drill and a little elbow grease, you can make a wonderful centerpiece in under 30 minutes!


Collect a piece of driftwood that will sit flat on your surface.  This is a bit tricky, but there are plenty of unique pieces out there if you just take some time to stroll along the shore line!

The piece above was taken off a river bank!

When you get the driftwood home, rinse it off with a hose, then allow to dry.  Make sure they are no bugs in the woods!

I used a 2" Hole Saw Bit and had my dad help me because the driftwood kept moving when I started drilling.  I only drilled about 1/4" down, just enough to allow the tea-lite glass to sit inside the hole.

If you want to use just regular "metal" tea-lites, you can use a 1 1/2" paddle bit, that is much easier to use, but you need to make sure that you keep an eye on the tea-lites while burning!

Once the holes were drilled, I sprayed the entire piece with some clear satin sealer and that's it!


This piece turned out absolutely beautiful and I have made about 5 more I will share with you soon!


Driftwood Wreath Tutorial


Hello!  It's been a while since I have posted!  I have been so busy with my son graduating, along with just taking some time to breathe and spend some quality time with him before he heads out to college!  He will be attending ODU so I am so glad he will be close to the beach!

Speaking of beach,,,,,I love collecting driftwood!

I thought it would be fun to share a quick and easy tutorial on how to make a Driftwood Wreath!

I love to collect & gather driftwood!

You don't have to go to the ocean to collect driftwood.  You can gather driftwood, along most shore lines, creek or river beds, like I do below.


To start you wreath you need to collect 4"-7" pieces of Driftwood.  Go ahead and grab a bucket because you will need at least 40 to have a nice size 24" wreath.


Supplies Needed!

Driftwood Pieces 4" - 7" In Length - about 40 pieces
Wire Wreath Frame
Beach Netting
Shells
Glue Gun & Glue Sticks


 When I make my wreaths, I only use the wire frame as a guide.  I don't glue the driftwood to the frame.  I start off my wreath by placing paper underneath the wire frame to avoid getting any hot glue drips on my table.  I place pieces of driftwood along the center edge of the wire frame in a circle, overlapping the driftwood on to each other to form the middle of the wreath.  I pick up each piece and add some hot glue underneath where it rests onto another piece and hot glue those two pieces together.  Allow to dry.  Continue around until the middle is done.  I then start hot gluing pieces of driftwood going outwards from the middle to the outer edge of the wreath, continuing to overlap pieces, still using you wire frame a s a guide to keep a nice circle, and continuing to go around until you get the desire look you want. I added layers on top of my original layer so my wreath is thicker.  Once totally dry, I turned the wreath over, and added hot glue to areas I felt needed it for durability.

Tie off the a piece of burlap or in my case a piece of beach netting.  Then add some shells into the netting and you have a great wreath, that about $5.00 in cost!


Wednesday, April 17, 2013

Vintage Tea Cup Bird Feeder Tutorial

Tea Cup Bird Feeder Tutorial


Supplies Needed:

Vintage Tea Cup & Saucer
E6000  Industrial Strength Adhesive
1/2" Copper Coupling With Stop
1/2" Copper Tube 48" Long or
Copper Tube Cut To Your Desired Length

My local ACE Hardware Store was more than happy to direct me to the plumbing section and they also cut my copper tube to my desired length!


Clean your tea cup and saucer and dry.

Turn your tea cup over and lightly sand the bottom of the tea cup.  

Add a generous amount of E6000 Industrial Strength Adhesive to bottom of tea cup and center cup on top of saucer.  

Place some coins in the cup to weight the cup down to the saucer and allow to dry overnight.


Once dry, turn your tea cup with saucer attached upside down and lightly sand the middle of the saucer to rough it up a bit before gluing on your Copper Coupling with stop.  


Place a generous amount of E6000 Industrial Adhesive in the center and place the Copper Coupling with Stop on top of the glue and allow to dry again over night.


Cut your 1/2" Copper Tube to length, or have your local hardware store cut to length for you like I did:)

Using a rubber mallet, tap the 48" copper tubing in to the ground being careful not to damage the tubing, then slide on the tea cup by inserting the small tubing connected to tea cup saucer on to the top of the tubing you just tapped into the ground!  

Fill will seed!